With the HubSpot and Shopify integration, there are a ton of things you can do when it comes to marketing and reporting.
HubSpot launched a variety of platform integrations in mid-2018, aimed at existing Shopify users all across the world. The Shopify connection is not only live, but it's also available to HubSpot clients in all versions of the platform at no cost.
The HubSpot–Shopify integration is designed to benefit small and mid-sized businesses' marketing and sales teams. It has also opened up a world of possibilities for businesses of all sizes in terms of how, where, and why they connect with their customers. Indeed, there are a number of wonderful things you can do now with HubSpot's Shopify integration that would have been difficult, if not impossible, before.
There are two different integrations available in the HubSpot App Marketplace which we usually recommend: Shopify provided by HubSpot and Shopify Sync by Unific. Unific´s integration is more advanced and it´s free for merchants getting less than 100 orders per month. HubSpot´s integration is free forever. Both integrations work with all HubSpot plans, from Free to Enterprise.
In this guide, we’ll cover a few of the best things you can do by integrating Shopify and HubSpot together as an eCommerce business.
The Benefits of Using Shopify + HubSpot
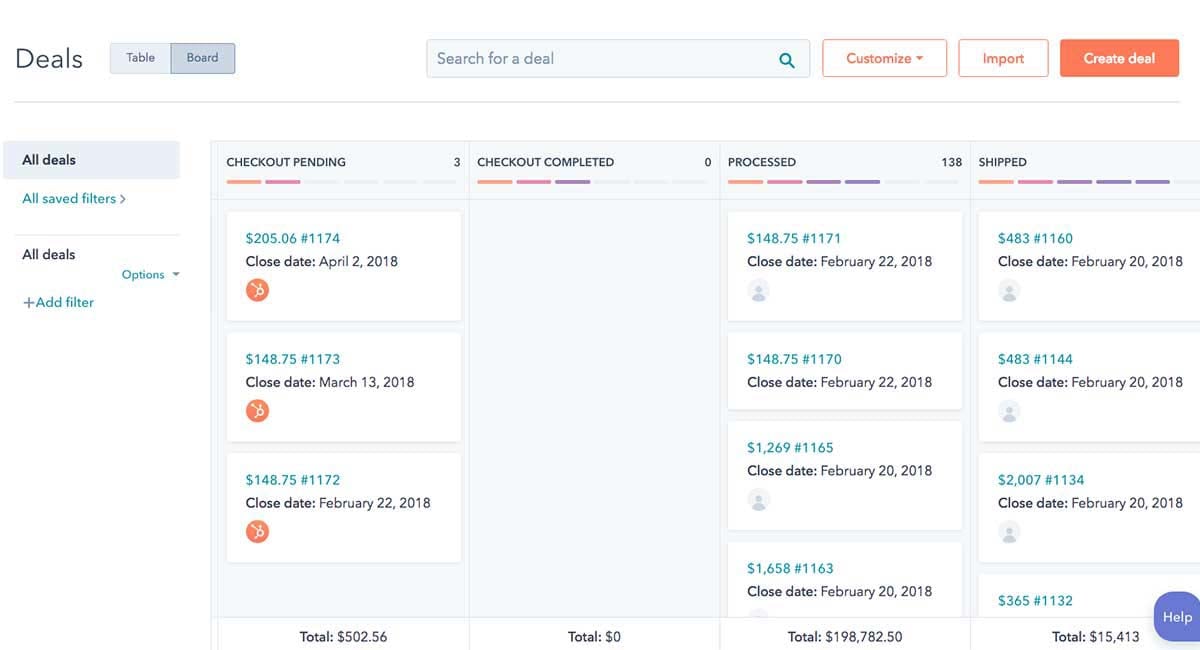
You can easily analyze Shopify data with HubSpot with tons of default reporting capabilities, such as tracking sales process, recovering abandoned carts, and generating easy-to-read reports. You can also automatically sync various orders, products, and contact between the two platforms.
How to Connect Your Shopify Store to HubSpot
HubSpot can be connected to one or more of your Shopify stores. Each connected Shopify store will have its own group of embedded eCommerce workflows and an e-commerce settings page.
- Click the Marketplace button in the main navigation bar in your HubSpot account, then pick App Marketplace.
- Locate and pick the Shopify integration using the search bar.
- Click Install app in the upper right corner.
- Enter your Store's Shopify URL in the dialog box and click Connect to Shopify.
- Enter your Shopify credentials in the pop-up box and click Log in.
- You'll notice a dialog box confirming that your Shopify shop has officially connected to HubSpot when you return to HubSpot. Your HubSpot tracking code will be instantly applied to all of your Shopify pages. By clicking Go to e-commerce settings, you may check the status of your Shopify data import or change your sync settings.
You can directly connect more Shopify stores from the Shopify integration webpage once your first store is connected. Click the store's name in the top left corner and select + Connect another store. Use the store name dropdown menu in the top left to switch between stores.
Top Things You Can Do with HubSpot as an e-Commerce Company Under Shopify
Automate Your e-Commerce Campaigns
Keep in mind that you'll need a Marketing Hub Professional or Enterprise account to do this. You may design workflows to follow up with contacts who engage with your e-commerce campaigns by automating your campaigns. Ecommerce email templates are used in the default e-commerce workflow emails. Custom deal-specific modules are included in these templates, which can be customized via the design manager.

- Click the Marketplace icon in the main navigation bar of your HubSpot account. Select Connected apps from the Manage menu.
- Select Set up an e-commerce workflow from the Shopify menu.
- Click Create a workflow under one of the three categories of e-commerce workflow:
- New customer - This workflow sends a series of emails to new customers and is triggered when they make their first transaction.
- Abandon cart - This workflow will be triggered 24 hours after a consumer has abandoned a cart, reminding them to place an order.
- Re-engagement - When a contact hasn't made a purchase in a certain number of days, this workflow sends them a series of re-engagement emails.
- Suggestions for workflow tasks will display in the Recommended area of the right panel. Click See more to see more actions. Add an action to your workflow by selecting it.
- After you've set up your action, click Save.
- Click the + plus icon to add another activity to the pipeline.
- When you're finished, click the "Done" button. To evaluate and turn on, go here.
- The workflow in the workflows tool will be redirected to you. Click Review in the upper right corner.
- After you've gone through the workflow options, click Turn on.
Use the Shopify+HubSpot Integration for Organic Social Media
After integrating with Shopify, the HubSpot Marketing Hub becomes your store's social media management software. You’ll need a Marketing Hub Professional or Enterprise license in order to use it.
You may create and post social media campaigns, as well as publish content to LinkedIn, Facebook, Instagram, and Twitter directly. You can also link your social media accounts to your blog and have content shared automatically as it is published. The program suggests the optimal times to post so you can plan your content around your audience's preferences. You can also keep an eye on social media mentions to make sure you don't miss out on a chat with a possible buyer.
Create an Ad Sequence for Facebook Through HubSpot
This is another action that can only be done through Marketing Hub’s Professional or Enterprise accounts.
- Go to Marketing > Ads in your HubSpot account.
- Select Facebook ad sequence from the left side of the ad setting page.
- Select an ad account and a Facebook page in the right side.
- Next should be selected.
- Select Create new post if you wish to make a new post.
- Enter the following URL for your website:
- Select HubSpot page, then select a page if your website is hosted by HubSpot.
- If your website is hosted elsewhere, choose Manually insert URL and type in your website's address.
- To upload an image or video, click Select Image/Video.
- Enter the text/body copy that will appear above your ad's image or video.
- Enter your headline, which will appear beneath your ad's image or video.
- Choose a call to action for your advertisement.
- If you wish to use an existing saved audience, click Select a Saved Audience, then select an Audience when you've finished setting up your ad. Saved audiences that target nations, regions, cities, designated market areas, or country groups can only be selected. You can't utilize your saved audience to create your sequence if it targets additional location types, such as zip codes.
Tips for Running a Top-Notch Conversion-Friendly Ad Campaign
If you're an eCommerce vendor, it's always a good idea to use a three-stage ad strategy.
Stage 1: Attract Customers
The purpose of this first advertisement is to attract the proper people without requesting anything in return. This should ideally be a video advertisement.
Stage 2: Conversion
The purpose of this exercise is to collect contact information. The stage employs a Facebook lead ad structure, which eliminates the need for the user to leave Facebook in order to submit. In the context of e-commerce, you might trade e-mail address information for a discount coupon or a newsletter subscription.
Stage 3: Complete
It's time to construct our final ad after generating our Attract and Convert advertising. This final ad is meant to bring everything to a close. We want it to retarget people who filled out the form but didn't proceed to our landing page or product page from Facebook.
Create and Customize Marketing Emails
Create sophisticated email campaigns that look great on every screen. Customize the layout, calls to action, and branding with the drag-and-drop editor. You can quickly tailor emails to increase the number of people who open and click on them.
You can simply offer up the most appropriate subject lines, links, attachments, and CTAs based on an email subscriber's lifecycle stage, list membership, or any other information in their contact record. Then, regardless of time zone, you can schedule your campaign and rest assured that your email will arrive in each mailbox at the ideal time.
Create Improved Contact Properties
The fact that you can now sync all of your customer field data between your Shopify database and your HubSpot account, ensuring that the customer purchase data from the former is always available for marketing and reporting purposes in the latter, is perhaps the most immediate benefit of HubSpot's new Shopify integration.
To do so, simply decide the fields you want to move from one site to the other and then add those fields in HubSpot. Once you've decided the fields you want to sync, go to your HubSpot account's "Contacts" menu and pick "Actions" from the dropdown menu at the top of the screen. From the menu, select the "Edit Properties" option.
Then, in the upper right corner, select "Create a Property" to create your new customer properties. Make sure that the "Field Type" values correspond to the real data you'll be gathering. After that, all you need to do is use the generate or update the contact API endpoint, and the entirety of your data will be seamlessly transferred from Shopify to HubSpot, ready for you to utilize.
If you need quick help setting up the HubSpot-Shopify integration, contact us. We´ll guide you how to choose the right integration between HubSpot´s and Unific´s solution.